The Ultimate Guide to Resetting Your Xbox One for Optimal Gaming Experience
As an avid gamer, you understand the importance of a seamless and uninterrupted gaming experience. Your Xbox One console is a powerful machine designed to deliver just that. However, like any electronic device, it can encounter issues that can hamper your gaming experience. This is where the importance of resetting your Xbox One comes into play.
Resetting your Xbox One is a crucial step in troubleshooting common problems such as slow performance, connectivity issues, or unresponsive apps. It's akin to giving your console a fresh start, clearing out any temporary files or data that may be causing issues. This process is often referred to as a "soft reset" or "hard reset" depending on the severity of the problem.
Moreover, resetting can also be beneficial when you're looking to improve your gaming experience. Resetting allows you to adjust your settings for optimal performance. Whether it's setting up a wired connection for faster gaming, setting up game sharing for multiplayer fun, or configuring a VPN for enhanced security, a reset provides a clean slate to make these changes effectively.
Furthermore, if you're planning to sell or give away your Xbox One, a reset is essential to remove your personal data and return the console to its factory settings. This ensures your privacy and allows the new user to start fresh.
In the following sections, we'll guide you on how to reset your Xbox One, set up various features for an optimal gaming experience, and troubleshoot common issues. So, buckle up and get ready to take your Xbox One gaming to the next level.

Now that we've established the importance of resetting your Xbox One, let's dive into the step-by-step guide on how to reset your Xbox One for an optimal gaming experience. Whether you're dealing with technical glitches or simply want to enhance your gaming experience, this guide will provide you with the necessary steps to achieve a successful reset. If you're also a fan of other gaming consoles like the PS4 or Nintendo Switch, you might find our articles on resetting your PS4 controller and resetting your Nintendo Switch helpful.
Before we begin, it's important to note that there are two types of resets: a soft reset and a hard reset. A soft reset is akin to restarting your console, while a hard reset will erase all data and return your Xbox One to its factory settings. Ensure you've backed up any important data before proceeding with a hard reset.
Soft Reset:
1. Press the Xbox button on your controller to open the guide.
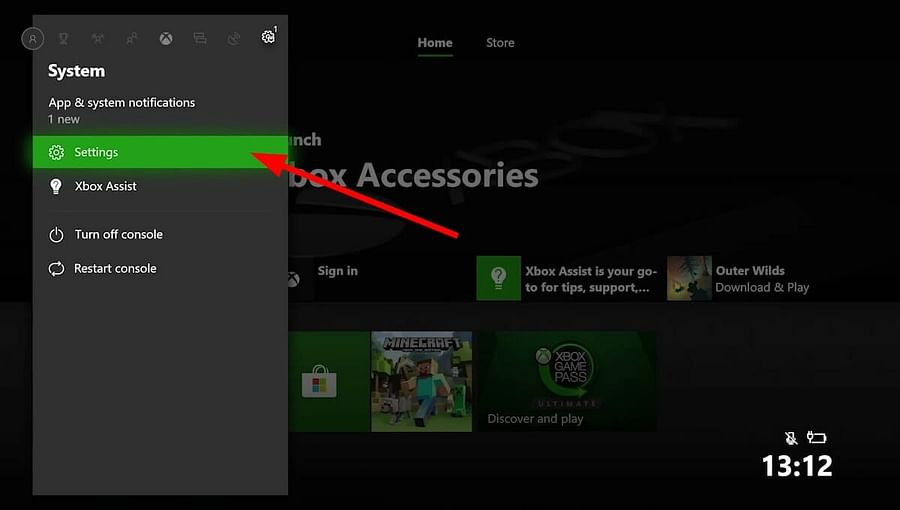
2. Navigate to the 'System' tab (represented by a gear icon) and select 'Restart console'.
3. Confirm your selection by choosing 'Restart'.
Hard Reset:
1. Press the Xbox button on your controller to open the guide.
2. Navigate to the 'System' tab and select 'Settings'.
3. Under 'System', select 'Console info'.
4. Choose 'Reset console'.
5. You'll see two options: 'Reset and keep my games & apps' and 'Reset and remove everything'. For a hard reset, select the latter.

After the reset, your Xbox One should be running smoothly, free from any previous issues. Now you're ready to set up your console for an optimal gaming experience. In the next sections, we'll guide you through setting up a wired connection, game sharing, a VPN, and a wireless headset on your Xbox One. If you're also using other devices like a Chromebook or an iPhone XR, you might find our guides on resetting and troubleshooting your Chromebook and factory resetting your iPhone XR useful.
Now that your Xbox One is reset and running smoothly, let's move onto the next step: Setting Up a Wired Connection on Your Xbox One for Faster Gaming. A wired connection can provide a more stable and faster internet connection than a wireless one, which is crucial for online gaming. Here's how to set it up:
First, you'll need an Ethernet cable. Connect one end of the cable to your Xfinity router and the other end to the back of your Xbox One.

Once connected, follow these steps:
Your Xbox One should now be connected to the internet via a wired connection. This should provide a more stable and faster connection, reducing lag and improving your overall gaming experience.
Remember, the quality of your gaming experience isn't just dependent on your console's settings, but also on your internet connection. A wired connection can provide significant improvements, especially for online multiplayer games where every millisecond counts.
Now that you've set up a wired connection, you're one step closer to achieving the optimal gaming experience on your Xbox One. In the next section, we'll cover how to set up game sharing for multiplayer fun.
Game sharing on Xbox One is a fantastic feature that allows you to share your game library with a friend or family member. This means that both of you can play the same game at the same time without having to purchase two copies. Here's how to set it up:
Firstly, you'll need to designate your friend's Xbox One as your 'Home Xbox'. This is how you share your games. Here are the steps:
Step 1: Press the Xbox button on your controller to open the guide. Navigate to the 'Settings' tab and select 'All Settings'.
Step 2: Under 'Personalization', select 'My home Xbox'.
Step 3: Select 'Make this my Home Xbox'.
Now, your friend needs to do the same on your Xbox One. Once this is done, you should both have access to each other's game libraries.
Remember, only one person can be your 'Home Xbox' partner at a time, and you can change your 'Home Xbox' five times per year. So choose your game sharing partner wisely!
Game sharing is a great way to expand your gaming library and experience new titles. Plus, it's a fun way to engage in some friendly competition or cooperative play. So why not give it a try and enhance your multiplayer gaming experience on Xbox One?
In the next section, we'll delve into how to set up a VPN on your Xbox One for enhanced security.
As we continue to explore ways to optimize your Xbox One gaming experience, let's discuss an often overlooked but crucial aspect - security. Setting up a Virtual Private Network (VPN) on your Xbox One can significantly enhance your console's security, protect your privacy, and even improve your gaming experience. A VPN can mask your IP address, encrypt your data, and allow you to access geo-restricted content. Here's a step-by-step guide on how to set up a VPN on your Xbox One:
Step 1: Choose a reliable VPN service. There are numerous VPN services available, but make sure to select one that offers high-speed servers, robust security features, and compatibility with Xbox One.
Step 2: Install the VPN on your router. Xbox One doesn't support direct VPN installation, so you'll need to install it on your router. This may vary depending on the router and VPN service you're using, so refer to the specific instructions provided by your VPN provider.
Step 3: Connect your Xbox One to the VPN-enabled router. Once the VPN is set up on your router, connect your Xbox One to the router's network. You can do this by going to 'Settings' -> 'Network' -> 'Set Up Wireless Network' on your Xbox One.
Step 4: Verify the VPN connection. To ensure that your Xbox One is connected to the VPN, you can check your IP address online. If it shows the IP address of the VPN server, then you're successfully connected.
Setting up a VPN on your Xbox One not only enhances your console's security but can also improve your gaming experience by reducing lag and latency. So, take the time to set up a VPN and enjoy a secure, optimized gaming experience on your Xbox One.

Now that you've secured your Xbox One with a VPN, it's time to enhance your gaming experience further by setting up a wireless headset. A wireless headset can provide an immersive gaming experience, allowing you to hear every detail of the game, communicate with your team, and even detect opponents' movements. Here's a step-by-step guide on how to set up a wireless headset on your Xbox One:
Step 1: Power on your wireless headset. Ensure that your headset is fully charged and turned on. Most wireless headsets have a power button that you can use to turn them on.
Step 2: Open the Xbox One settings. From the Xbox One home screen, navigate to the 'Settings' menu. You can find this by scrolling down to the 'System' tab and selecting 'Settings'.
Step 3: Select 'Devices & connections'. In the 'Settings' menu, select the 'Devices & connections' option, then choose 'Accessories'.
Step 4: Sync your wireless headset. Press the 'Sync' button on your wireless headset. Then, on your Xbox One, select the 'Pair new device' option. Your Xbox One will start searching for available devices. Once your headset appears on the screen, select it to pair.
Step 5: Test your headset. After pairing your headset, test it to ensure it's working correctly. You can do this by playing a game or using the 'Test headset' option in the 'Audio' settings.
Setting up a wireless headset on your Xbox One can significantly enhance your gaming experience, providing immersive audio and clear communication. So, don't wait - set up your wireless headset today and dive into a whole new world of gaming.

Now that you have your wireless headset set up, let's delve into how you can get the most out of your Turtle Beach headset on Xbox One. Known for their superior sound quality and comfort, Turtle Beach headsets are a popular choice among gamers. However, to fully enjoy the benefits of these headsets, you need to set them up correctly and optimize their settings.
Step 1: Update Your Headset's Firmware
Firstly, ensure your Turtle Beach headset is running the latest firmware. This can improve the headset's performance and fix any existing issues. You can update the firmware by connecting your headset to a PC and using the Turtle Beach Audio Hub software.
Step 2: Adjust the Audio Settings
Next, adjust the audio settings on your Xbox One to match your Turtle Beach headset. Navigate to 'Settings' > 'General' > 'Volume & audio output'. Here, select 'Headset format' and choose 'Windows Sonic for Headphones' for the best audio experience.
Step 3: Use the Superhuman Hearing Mode
Turtle Beach headsets come with a unique feature called Superhuman Hearing Mode. When activated, this mode enhances in-game sounds like footsteps and weapon reloads, giving you a competitive edge. To activate this mode, simply press the 'Mode' button on your headset until you hear a beep.
Step 4: Adjust the Microphone Level
Lastly, adjust the microphone level to ensure clear communication with your team. From the Xbox One settings, go to 'Devices & connections' > 'Accessories'. Select your Turtle Beach headset and adjust the 'Mic monitoring' slider until you reach the desired level.
By following these steps, you can optimize your Turtle Beach headset for an immersive and competitive gaming experience on Xbox One. Remember, the key to a great gaming session is not just about having the right equipment, but also knowing how to use it effectively.
Now that we've optimized your audio experience, it's time to focus on another crucial aspect of your gaming setup: your Xbox One controller. Whether you're a casual gamer or a competitive player, having your controller set up correctly can significantly enhance your gaming experience. Here's a step-by-step guide on how to set up your Xbox One controller for optimal performance.
Step 1: Update Your Controller's Firmware
Just like your Turtle Beach headset, your Xbox One controller also needs the latest firmware for optimal performance. Connect your controller to your Xbox One, navigate to 'Settings' > 'Devices & connections' > 'Accessories', select your controller, and click on '...'. If an update is available, you'll see an 'Update now' option. Click on it to start the update process.
Step 2: Adjust the Controller Settings
Next, adjust the controller settings to match your gaming style. Go to 'Settings' > 'Ease of Access' > 'Controller', and here you can customize button assignments, vibration settings, and stick sensitivity according to your preference.
Step 3: Set Up a Wireless Controller
If you're using a wireless controller, ensure it's properly connected. Press the Xbox button on the controller to turn it on, then press the connect button on your Xbox One. After that, press the connect button on your controller. The Xbox button will flash for a while, and once it stays lit, your controller is connected.
Step 4: Set Up a Controller on PC
If you're gaming on a PC, you can still use your Xbox One controller. Connect it to your PC via a USB cable or Xbox Wireless Adapter. Then, go to 'Settings' > 'Devices' > 'Bluetooth & other devices', click on 'Add Bluetooth or other device', then select your controller.
By following these steps, you can ensure your Xbox One controller is set up correctly, providing you with a smoother and more responsive gaming experience. Remember, a well-set controller can be the difference between victory and defeat in your gaming sessions.

Michael is a tech journalist and content creator who is passionate about exploring the latest trends and products in the industry. He enjoys sharing his insights and opinions with others, and is always on the lookout for new and exciting stories to cover.
All Rights Reserved © 2025


Post a comment